Many political campaigns on Facebook have not been launched. Why?
Because advertisers don't always engage in the authorization process that is required for ads related to social issues, elections, and politics. Meanwhile, it is quite simple, isn't it? Do you not believe it? Read it and see for yourself.
POLITICAL CAMPAIGNS ON FACEBOOK
Campaigns on social and political issues must go through an authorization process. At first, it may seem complicated, so it is not surprising that some politicians, instead of delving into the rules, prefer to sue Facebook for restricting freedom of speech... Below we offer a brief and clear explanation of what to do to start a political campaign on Facebook.
STEP 1. Two-factor authentication
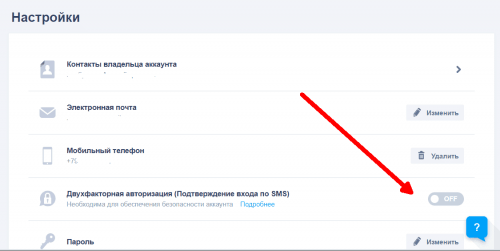
To enter and broadcast political ads on Facebook, you need to enable two-factor authentication. In fact, anyone who cares about the security of their profile, fan pages, and advertising accounts should have it enabled. If you haven't started yet:
Click here (Or select Settings > Security & Sign-in > Two-factor authentication > Use two-factor authentication) > Get started > Choose one of two security options: an authentication app (Facebook will provide you with a QR code to connect) or SMS (you'll receive an SMS with a code after entering your phone number) > Done!
STEP 2. Check your personal account
You must be a verified advertiser to run political ads. What does this mean? You must verify your identity by sending Facebook a copy of your ID (e.g., ID card/driver's license/passport/passport/marriage certificate/personal or vehicle insurance card - for example, a the whole list can be found HERE) Or download the form and confirm it with a notary. Below are instructions on how to deal with this quickly:
Click here(Or choose Settings in your account > General > Verify ID) > enter your Facebook login password > Start verifying your identity > Posting social, election or political ads > find Ukraine in the drop-down list and click "Get started" > upload a scan/photo of the document (you can blur sensitive data such as the document number - the most important thing is that the name on the document matches the name you have on Facebook) > wait for confirmation (you will receive a notification - as we recall, it took us literally 2 minutes).
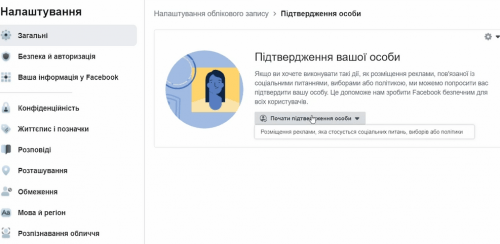
Why does Facebook want my data? As it explains, to ensure advertising transparency and fair choice. This way, it knows "[...] who is responsible for material and advertising funding for political candidates, people elected to public office, and important issues such as immigration." A copy of the ID card may be kept for no more than one year.
STEP 3. AUTHORIZATION ON THE FANPAGE
It should be clear to Facebook users who is donating money on the ad - under the word "Sponsored" there should be a so-called booking, information about the funding entity. You must have two-factor authentication enabled on Facebook and a verified identity to add them. If you have successfully completed the previous two steps, you are done with it and... go for it!
Go to the settings of the fan page to which the announcement will be assigned > in the left column, find the authorization tab. After clicking it, you will see the following view:
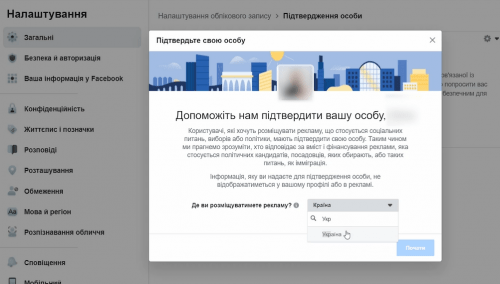
In the drop-down menu, select Ukraine instead of the United States. If you have successfully completed step 2 and are already a verified Facebook user, the following message will appear in the Verify your identity section: Verified - if not, you have started the verification process: Pending (in this case, Facebook has not yet verified the document you left and you should wait or contact support if it takes longer than 24 hours). With your verified identity, you can now go to the Link to Ads Accounts field. Click Get started and accept the Terms of Service. Link your ad account by selecting it from the list you read or entering its number. Click Next and... we are in the Ad Management section:

A disclaimer is information about who is paying for the ad. Facebook offers to enter your name here, but you must use the full name of the election committee. Then you enter contact information (not yours, of course, but the committee's). Facebook will send authorization codes to the following number: phone number and email address - verification is mandatory, so you need to make sure everything works smoothly. If it does, you're done! You can start your election campaign!
STEP 4: Election campaign on Facebook
If you have completed all the previous steps, you can create ads in the advertising account to which you have assigned this fan page and created reservations. At the stage of setting up the ad, you need to choose: This ad is about social issues, elections or politics.
Facebook limits or even completely prevents the launch of a promotion if the text covers more than 20% of the ad space. This can be problematic if you want to promote an election poster. What to do? Design the best poster from scratch! While horizontal banners probably work on the streets, it's better to think about a vertical version on Facebook (we recommend 1000 x 1250 pixels). Most of the traffic is mobile traffic - a voter browsing the news on their phone is more likely to notice a graphic that takes up the entire screen than a horizontal data bar that is often difficult to read. If you do choose a horizontal poster, it is good if it fits in this size: 1200 x 900 pixels. You can check if there is too much text on it HERE. If you still find that there is too much of it, in addition to reducing the number of characters or font size, you can try reducing the contrast or making the layers transparent - sometimes this helps.
In order to start promoting, whether you are promoting political content or a boutique assortment, advertising should not violate standards и Rules for advertising placement on Facebook.


